Build Yourself an AI Powered Microscope – DevConf 2024

Thank you everyone who attended my session at both DevConf Cape Town and Johannesburg
I met so many awesome people during DevConf inside and outside of my session! Thank you for making DevConf 2024 the incredibile conference it was!

I’ve included the slides for those interested in building your own DIY Microscope, or something similar to help you with your own accessibility challenges. If you have an imaging device with some intelligence, there’s so many things you can do!

The project is using a Raspberry Pi 3B (4 and 5 works too). It is build using C# and .NET 8. The user interface is created using AvaloniaUI. There’s nothing better that Avalonia if you need to create small, incredibly fast user interfaces on Linux using .NET. I really recommend trying it out!

The backend is using Azure CosmosDB for storage. The MongoDB VCore Implementation. This is chosen for it’s vector search capabilities. Perfect for a conversational solution using OpenAI.

The slides can be found below

The whole premise of the talk was to inspire developers to think about using all these tech components in your toolbox. Both AI and IoT bits and use it for good. There’s so many solutions that could be created especially for accessibility, to make people’s life a little easier. This is also exactly why I created this Microscope, to solve my own accessibility problems when building IoT solutions. Think about what you could do!

Recorded Demos

Demo of analysing a Gigatron board
Unicorn HATs and dynamic lighting!
Using a Conversational Interface
Looking a ZX Spectrum RAM Chips
Helios Speaks Afrikaans!

The Microscope Tech Stack

.NET 8 (C#) https://learn.microsoft.com/en-us/dotnet/core/whats-new/dotnet-8/overview

Avalonia UI https://avaloniaui.net/

SkiaSharp https://github.com/mono/SkiaSharp

Azure CosmosDB https://azure.microsoft.com/en-us/products/cosmos-db

Azure AI Vision https://azure.microsoft.com/en-us/products/ai-services/ai-vision

Azure Speech https://azure.microsoft.com/en-us/products/ai-services/ai-speech

Azure OpenAI https://azure.microsoft.com/en-us/products/ai-services/openai-service

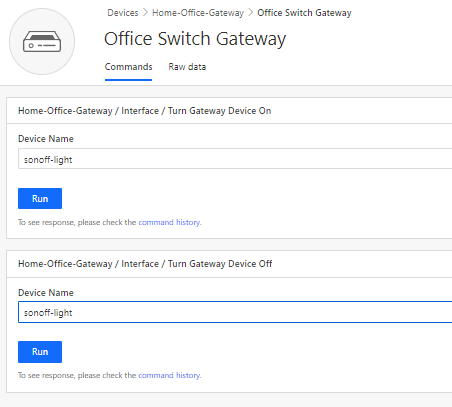
Azure IoT Edge https://azure.microsoft.com/en-us/products/iot-edge

Docker https://www.docker.com/

Mosquito MQTT https://mosquitto.org/

The components used can be found here. You can put this all together yourself!

Some photos of the session at DevConf 2024

I hope to see you next time! Happy building and learning with cool tech!!! ๐Ÿ˜

Microsoft Developer Cloud Summit 2021

I hope you enjoyed the Microsoft Developer Cloud Summit today! Thank you very much for attending my session: Automating your home or office with IoT Central and Power Apps” It was a lot of information in 30 min, so here’s the content, resources and source code.

This whole session was done using Home Automation devices combined with OBS. Camera Scene changes were controlled with a standard home remote control. So automation doesn’t have to be traditional garage doors or lighting, you can control you PC life too! ๐Ÿ˜Ž Controlling your OBS Scenes with a Home Automation device

Link to Presentation: Microsoft Developer Cloud Summit 2021 Presentation

Topics

Connecting a Pimoroni Environment Monitor to IoT Central

Connecting Azure IoT Central to Power Apps and Power Automate

Arduino Smart Watering Kit with Azure IoT Central

Building an Azure IoT Central โ€œGatewayโ€ using Node-RED

Flashing Sonoff Devices with TASMOTA

Controlling your OBS Scenes with a Home Automation device

Installing Node-RED in a Container

Installing Eclipse Mosquitto in a Container

Other Resources

IoT Central

https://azure.microsoft.com/en-us/services/iot-central/

Power Apps

https://powerapps.microsoft.com/en-us/

Node-RED

https://nodered.org/

Tasmota

https://tasmota.github.io/docs/

Environmental Monitor

https://www.pishop.co.za/store/enviro–for-raspberry-pi?keyword=enviro&category_id=0

Sonoff

https://www.takealot.com/all?filter=Brand:Sonoff

Controlling your OBS Scenes with a Home Automation device

You can easily set up a standard 433 Mhz remote control that you use every day in your home to control scenes in OBS (Open Broadcast Software) if you don’t own a fancy Stream Deck.

All you need is a remote, a 433 Mhz Wifi Bridge and some Node-RED magic.

Sonoff 433 Mhz Bridge

Flash the bridge using these instructions: https://explorationspace.co.za/2021/02/10/sonoff-rf-bridge-433-tasmota/

Standard Home Automation Remote control
433 Mhz Wifi Bridge to OBS via Websockets Node-RED Flow

Install the OBS Websocket plugin: https://github.com/Palakis/obs-websocket/releases/tag/4.9.0

Node-RED Switch using button codes to control flow

The 433 Mhz Bridge when it detects a signal, it publishes a message with it’s contents via MQTT. These will have codes attached to them and in the case of a remote, that code / data that is sent via the message payload translates to the button pressed. You can “train” your solution with the remotes you have. These can be standard house-hold remotes.

Scene flows per button press

The switch statements routes the flow based on the button data to a specific function.

Scene switch command to OBS Socket Server

The function sends a message with the “scene-name” with the parameter of the scene created in OBS.

Scenes in OBS

For additional commands refer to the protocol document:

https://github.com/Palakis/obs-websocket/blob/4.x-current/docs/generated/protocol.md

Happy streaming! ๐Ÿ˜Ž

Building an Azure IoT Central “Gateway” using Node-RED

I control a few devices from the Internet, but I don’t want all devices exposed and connected to IoT Central. One solution is to build a gateway locally which routes request messages to switch things on or off to the correct device locally.

In this post we will look at how to send commands from IoT Central and route them using Node-RED to the automation device via MQTT.

Home Automation Gateway Architecture

This architure uses Node-RED as a gateway, and then uses Eclipse Mosquito as a MQTT server. The Grow Light and Air Conditioner in the diagram is an off the shelf Sonoff POW-R2 device flashed with Tasmota.

Flashing with Tasmota

Installing Eclipse Mosquitto in a Container

Installing Node-RED in a Container

“Gateway” flow in Node-RED

With Node-RED you can visually map the flow / sequence of events. Node-RED supports Azure IoT Hubs and Azure IoT Central, so it’s perfect for this job to do quickly and easily without having to write code.

Gateway device created in IoT Central’s Command Capabilities

In Azure IoT Central we have a single device linked with a command. The command accepts a parameter, which will be the device name / topic name on the local MQTT server.

Executing a command on IoT Central

The diagram above shows the command with the parameter.

Defined Methods to IoT Central Commands

The Node-RED Azure component supports Direct Methods. These are commands that you can directly invoke on a device. In this case, the device is the gateway itself created within Node-RED.

It supports two methods (as per Azure IoT Central template)

  • turngatewaydeviceon
  • turngatewaydeviceoff
Switch to determine flow based on Direct Method Invoked from IoT Central

With a Node-Red switch statement we can controll the flow with whichever method name was invoked from IoT Central.

Switch Home Automation On flow

If it’s the “DeviceOn” flow, then the device parameter name (payload) is used to build up the topic for the Sonoff device via MQTT. The payload of the message will be “on”.

Switch Home Automation Device Off Flow

If it’s the “DeviceOff” flow, then the device parameter name (payload) is used to build up the topic for the Sonoff device via MQTT. The payload of the message will be “off”.

Flashing Sonoff Devices with TASMOTA

The Sonoff devices are great, but I prefer to use everything within my home and home automation setup to be fully under my control. Tasmota is a great way of doing just that.

I found the easiest way of flashing devices with Tasmota is using a raspberry pi. I’ve done a quick writeup on how to do this.

Installing ESPTool

Start with installing via the installer script

pip install esptool

Clone from the GitHub repository

git clone https://github.com/espressif/esptool.git

Preparing the Raspberry Pi

sudo raspi-config
Choose Interfacing Options
Configure Serial
Disable login shell via serial
Enable serial port hardware
Serial setup complete

Connect the Raspberry Pi to the Sonoff Device

Raspberry Pi Pinouts (Serial)

The TXD (Transmit) and RXD (Receive) pins are marked on the raspberry pi. We can use these to communicate serially with the Sonoff Device to flash it with the Tasmota firmware.

Sonoff POW R2 Device

Each Sonoff device has pins allocated to reflash the device. These boards usually don’t have headers attached. Here I soldered one to the board.

The important pins are VDD, TX, RX and GND.

Flashing the device with a Raspberry Pi

Connect VDD to an external power supply. The Raspberry Pi will not be able to power the device off it’s own pins. I used an external bench power supply. Ensure the voltage is 3.3V.

Connect the GND on the power supply to both the Raspberry Pi Ground Pins and the Sonoff device’s GND pin

Connect the TXD on the Raspberry Pi to the RX Sonoff pin and connect the RXD on the Raspberry Pi to the TX Sonoff pin.

Download the Tasmota Firmware

curl http://ota.tasmota.com/tasmota/ --output tasmota.bin

This terminal command will download the latest firmware from the Tasmota site to the Raspberry Pi.

sudo ./esptool.py --port /dev/ttyS0 erase_flash

Start by erasing the devices Flash memory

The port to use on a Raspberry Pi 3 or 4 is /dev/ttyS0.

sudo ./esptool.py --port /dev/ttyS0 write_flash -fm dout 0x0 tasmota.bin

Flash the device with the dowloaded firmware.

Once flashed, reassemble the device and power it on. It should appear as an access point on the network as Tasmota-xxxx if all went well.

You can also follow the Tasmota getting started guide to continue the setup: https://tasmota.github.io/docs/Getting-Started/

Installing Node-RED in a Container

Node-RED is a programming tool for wiring together hardware devices, APIs and online services in new and interesting ways.

It provides a browser-based editor that makes it easy to wire together flows using the wide range of nodes in the palette that can be deployed to its runtime in a single-click.

Running Node-RED is easiest in a Docker container. This is really easy to set up.

docker pull nodered/node-red

Pull the container from the Docker Repository

sudo docker run -d -p 1880:1880 -v /home/ubuntu/docker-nodered/data:/data --name mynodered nodered/node-red

Start Mosquitto.

The default port for Node-RED is 1880. Also ensure that the volumes are mapped to a local folder on the host to preserve the configuration.

Installing Eclipse Mosquitto in a Container

Eclipse Mosquitto is an open source (EPL/EDL licensed) message broker that implements the MQTT protocol versions 5.0, 3.1.1 and 3.1. Mosquitto is lightweight and is suitable for use on all devices from low power single board computers to full servers.

The MQTT protocol provides a lightweight method of carrying out messaging using a publish/subscribe model. This makes it suitable for Internet of Things messaging such as with low power sensors or mobile devices such as phones, embedded computers or microcontrollers.

Running Mosquitto is easiest in a Docker container. This is really easy to set up.

docker pull eclipse-mosquitto

Pull the container from the Docker Repository

sudo docker run -d -p 1883:1883 -p 9001:9001 -v mosquitto.conf:/home/ubuntu/mosquitto/config/mosquitto.conf -v /mosquitto/data -v /mosquitto/log eclipse-mosquitto

Start Mosquitto.

The default port for Mosquitto is 1883. Also ensure that the volumes are mapped to a local folder on the host to preserve the configuration.