Cross Platform Iot at CTXUG

Last night was the Cross Platform Iot Session at CTXUG in Cape Town.    The turnout was absolutely amazing!    Thank you to all for coming it was a really fun evening!


Roger Weiss from Aliens kicked off with an overview of Windows 10 Iot Core and a few demos.  These demos featured some awesome use of Microsoft Cognitive services and also some nifty voice controlled home automation.


It was then my turn.   Unfortunately Chris van Wyk couldn’t make it this evening.  🙁


The session featured


Visual Micro for Visual Studio

Visual Studio Code with Arduino Extension which is now Open Source.

Xamarin Forms and Xamarin.Android with Android Things 0.41 Preview

The new Xamarin Iot preview for Linux based devices

Azure Iot Hubs


Devices wise 


Raspberry Pi 3

Intel Edison

Raspberry Pi Zero W

Latte Panda and Arduino Leonardo

MXChip Azure Kit

Devices everywhere! Latte Panda, Pi With Android Things. NexDock


The awesome new MXCHIP Azure Iot kit (Arduino)


The presentation can be found here:  https://github.com/apead/XUGSA/tree/master/19072017

Android Things Weather Station Sample with Azure Iot Hubs:    https://github.com/apead/Xamarin-AndroidThings-Contrib

Cross Platform Generic Xamarin Forms sample that ran on Phone, Android Things and Windows 10 Iot (I didn’t demo this, but it works too):   https://github.com/apead/XUGSABuildAutomation


Xamarin Android Things Nuget:  https://www.nuget.org/packages/Xamarin.Android.Things/0.4.0-devpreview


Xamarin Android Things Contrib Drivers:  https://www.nuget.org/packages/Xamarin.AndroidThings.Contrib.RainbowHat/0.40.0-beta


Getting Started with Xamarin Iot:   http://explorationspace.co.za/2017/06/21/xamarin-iot-comes-to-visual-studio-2017-on-windows/


MXChip Azure Kit:   https://microsoft.github.io/azure-iot-developer-kit/


Android Things Starter Kit with Rainbow Hat:   https://shop.pimoroni.com/products/rainbow-hat-for-android-things


Rainbow HAT


There’s a Xamagon!


Interesting VR Stuff happening in Aliens office

Android Things GPIO Callbacks

Following the blog post to get you up and running with Android Things, Visual Studio and Xamarin.  http://explorationspace.co.za/2017/02/26/using-xamarin-and-visual-studio-with-android-things/


Android Things has GPIO callbacks which are triggered on certain trigger events.    This is great for event handling.    I’ve added a sample to Xamarin bindings which illustrates this by means of a Grove PIR (Passive InfraRed) sensor much like what’s in your home alarm system.   If we use that in conjunction with a buzzer, you have a primitive alarm system.


The source can be found here:   https://github.com/apead/Xamarin-Android-Things


Intel Edison with PIR and Buzzer


Gpio callbacks are classes implemented inheriting from the abstract class Gpio Callback.    This call back is triggered on certain trigger types.   This are set on the gpio pin with the settriggertype method.

  • EDGE_NONE: No interrupt events. This is the default value.
  • EDGE_RISING: Interrupt on a transition from low to high
  • EDGE_FALLING: Interrupt on a transition from high to low
  • EDGE_BOTH: Interrupt on all state transitions


 public class AlarmCallback : Com.Google.Android.Things.Pio.GpioCallback
 {
 public Gpio BuzzerPin { get; set; }

 public override bool OnGpioEdge(Gpio p0)
 {
 if (p0.Value)
 {
 if (!BuzzerPin.Value)
 {
 BuzzerPin.Value = true;
 Thread.Sleep(1000);
 BuzzerPin.Value = false;
 }
 }

 return true;
 }

 public override void OnGpioError(Gpio p0, int p1)
 {
 Log.Info("Alarmcallback", "Error");
 }
 }


The class has two methods to override.   OnGpioEdge and OnGpioError.     The OnGpioEdge method is called on a trigger event.     The OnGpioError is called on an error.


This class is registered on the actual input gpio pin.


_callback = new AlarmCallback {BuzzerPin = _buzzerGpio};

_alarm1Gpio.RegisterGpioCallback(_callback);


Happy Android Things development with Xamarin!


Using Xamarin and Visual Studio with Android Things

Android Things is Google’s new IOT Android based platform.    In essence it’s a slightly altered version of Android which can run on Iot type devices such as the Intel Edison and the Raspberry Pi3.


“Android Things lets you build professional, mass-market products on a trusted platform, without previous knowledge of embedded system design.”


Personally I’m not yet too impressed with Android Things.   It is still very new and very raw and is lacking a lot of what you’d expect from an Iot platform.   However, having finally a standard Android implementation officially from Google running on these devices has to be a good thing.    The platform should just get better from here.


Running in Visual Studio using Xamarin


Of course being Android, Android Things works with Xamarin too.     Using Xamarin will also be a benefit for all those awesome cross platform benefits it offers, like sharing your Iot code with your backend services, Android, Ios, Windows Phone, Windows 10, OSX, XBox and whatever other devices you’d like to be supporting in your solution.


Getting the devices to appear in Visual Studio is exactly as you’d expect.    The devices will use the standard Android Debugging Bridge (ADB).      Plugging in an Intel Edison via USB will be reflected as “Unknown Iot_Edison”.    You can obviously also use the network debugging features of ADB.   eg.   adb connect <ip address>   The device will then also be detected in Visual Studio.   A Raspberry Pi will appear as “Unknown iot_rpi3”.


Using Xamarin is very simple.    All we need to do is bind to the Android Things API Jar to be able to make use of all the features provided by the Android Things SDK.   At this moment in time there isn’t an official release Nuget package from Xamarin to do this.   It is however very simple to do this yourself.     In this sample (and I’ve shared the code on GitHub) I’m binding to the new Dev Preview 2 API for Android Things (androidthings-0.2-devpreview.jar).    Once the binding project is referenced from your Android Things project, everything will work as expected.   Just of course with the benefit of using C# and not Java!


I’ve created some samples based on the Standard Android Things Samples


Samples:   https://github.com/apead/Xamarin-Android-Things

Blink Led

No Iot sample and demo is complete without a blinking LED.   This sample is a conversion of the Android Things sample.


Simple UI

This sample is a simple illustration of using a UI on an Android Things device.   It also illustrates GPIO pins and how to set the high/low values of the pins.


Simple UI Android Things Sample


Learning Resources:


SDK Samples:  https://developer.android.com/things/sdk/samples.html

How to install Android Things on your Device:   https://developer.android.com/things/preview/index.html

A great article on the basics of electronics and hardware:  https://riggaroo.co.za/android-things-hardware-basics/


Happy Android Things Development with Xamarin!

Installing Xamarin Cycle 9 side by side with Android Studio

You may need to run Android Studio and Xamarin side by side from time to time.   This may be needed if you are an Android developer experimenting with Xamarin or maybe you are migrating an Android application to Xamarin.   I run the two side by side often especially when I am binding native libraries for Xamarin.        I put together a guide to make the new Xamarin Cycle 9 release and Android Studio 2.2.3 run together without any pain and also without wasting disk space with multiple copies of Android Sdks.    I also find it’s much cleaner to install everything manually without the installers.     This guide is specifically aimed for Windows and Visual Studio 2015+ users.


Installing Xamarin

Install Java JDK 1.8  x64  (Use the latest update of this available)http://www.oracle.com/technetwork/java/javase/downloads/jdk8-downloads-2133151.html


Install the Android NDK


The NDK is a zip file.  Extract this to a location that’s easily accessible:   C:\AndroidSDK\android-ndk-r13b-windows-x86_64


Install the Android SDK


The simplest and cleanest is to install the command line version of the SDK

Android SDK Command line installation: https://dl.google.com/android/repository/tools_r25.2.3-windows.zip

This is just a zip file not requiring any installation.  Extract the contents to a location that’s easily accessible.  Eg.  C:\AndroidSDK\tools_r25.2.3-windows


Install the required SDK Tools and APIs

From command line execute <Android SDK>\tools\android  This will open the SDK manager.


Install Android SDK tools 25.2.5

Install Android SDK platform tools 25.0.3

Install Android Build tools 25.0.2


Install API 25 SDK Platform   (and whichever other APIs you require)

Install “Sources for Android SDK” for API 25.    Xamarin does not require this, but Android Studio will later request it be installed.    This will simplify the later setup if done now.


Install Google Repository

Install Google Play Services

Install Android Support Repository


Install Xamarin for Visual Studio 4.3.   If you installed Xamarin with Visual Studio 2015, you have it already.    To upgrade to Cycle 9 use the Updater Channel within Visual Studio.      Alternatively if you don’t have it, you can manually install it:  https://store.xamarin.com/account/my/subscription/downloads.   Download the individual installation package per platform (and not the universal installer).  At the time of writing this there isn’t a direct link to cycle 9, so download cycle 8 and update it.


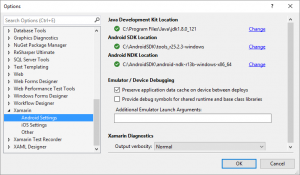
Set up the SDK paths within Visual Studio.   There is a setting for both the path to the NDK and SDK previously installed.  The location of the Java SDK should be set here too.    Visual Studio will need to be restarted for this to take effect.


Note:   If Xamarin was previously installed via the Visual Studio or the Xamarin Universal Installer.  There will be another Android SDK installed.    This is most likely:   C:\Users\<user>\AppData\Local\Xamarin\Universal\AndroidSDK.     If the steps above were followed, this previous path can be safely removed.       This folder can be used to share the SDK with Android Studio, however personally I don’t think it’s a great location for doing that.


The Xamarin Cycle 9 installation is complete and should now work with the new SDK location.


Installing Android Studio 2.2.3


Download the Android Studio zip file (without installer and SDK):   https://developer.android.com/studio/index.html


Extract the Android Studio Zip to any desired location eg:  D:\AndroidStudio\android-studio-ide-145.3537739-windows


On first run, Android studio will start the wizard to set itself up (and download the SDK).   Skip the wizard.


Choose “Settings” from the Start screen.


Specify the path previously used for the Android SDK. eg:  C:\AndroidSDK\tools_r25.2.3-windows


Everything needed should already be in place, so Android Studio will accept the SDK without any problems.


Android Studio should now work fine with shared SDK with Xamarin.


Happy Xamarin and Android Coding!


Arduino Development with Visual Studio via Visual Micro (Overview)

Visual Studio has become a one stop shop for any type of development.  But did you know you can do Arduino development as well?    There is a Visual Studio extension called Visual Micro (http://www.visualmicro.com) which will allow Arduino development and debugging within Visual Studio IDE, with the full development experience you have become used to.   This is a high level overview of what is provided.


Arduino and Visual Studio


What’s really great about having Arduino support within Visual Studio is, you can group together all the various different projects that makes up your solution all together within a Visual Studio Solution.


Multi-platform Solution


In a world of Iot and cross platform (or multi platform) development this is perfect.   You could have one or more Arduino projects, .NET Micro framework projects,  a Xamarin Mobile client and the back-end (be it an on-premise ASP .NET WEB API solution, or in the cloud with something like Azure Mobile Services) all managed together in a single Visual Studio solution.


Installing Visual Micro


Visual Micro can be downloaded here:   http://www.visualmicro.com/page/Arduino-Visual-Studio-Downloads.aspx   It is a Visual Studio extension which will be installed within Visual Studio.   There is a version for both Visual Studio 2015 and 2017 RC.     Be sure to have the standard Arduino IDE installed as well, as it uses this tooling under the hood.   Arduino version 1.06 – 1.8 is supported.


The IDE Experience


Visual Micro Toolbar


Visual Micro Menu


Both a toolbar and a new menu is added to Visual Studio.    The toolbar allows access to quickly configure the connected board and COM port used (via USB).    It also allows quick access for building and debugging, however if the Arduino project is the startup project the debugging and build options work as usual direct from the Visual Studio hotkeys, toolbars and menu items.    The menu allows for deeper configuration of the compiler, debugging options and other integration options.


File New Dialog

Templates are provided to easily create a new Arduino Sketch or Library.    Standard Arduino INO files are supported.   These standard file types are also used when opening and saving to existing Arduino Sketch files, which ofcourse can be ported back to the Arduino IDE if need be.


Solution Explorer


The solution explorer is quite neat for the Arduino.   All the source files, header files and external dependencies are presented in much the way you have grown accustomed to in Visual Studio.


The Visual Micro Explorer provides a visualization of all libraries installed.    There is also reference material and documentation provided along with a collection of Example code.   This is great for both learning and quickly looking up something.


The debug experience


Debugging Experience


Debugging and conditional breakpoints are supported.   This does though require a purchase of the Pro version.   The pro version has quite a number of additional features aswell which you can read about here:  http://www.visualmicro.com/page/What-features-are-included-in-Visual-Micro-Pro.aspx


The live tracing works great.  There is also the standard port monitor which does live logging of the Com ports.    In the screenshot provided the codes displayed are being reported from an infrared remote control in real-time.   The ability to see everything happen, and be visible, at once in an IDE saves a whole load of time.


Conclusion

I’ve been using Visual Micro for a few Arduino related Iot projects and can definitely recommend using it.


Happy Arduino coding!  🙂