Last night was the Cross Platform Iot Session at CTXUG in Cape Town. The turnout was absolutely amazing! Thank you to all for coming it was a really fun evening!
Roger Weiss from Aliens kicked off with an overview of Windows 10 Iot Core and a few demos. These demos featured some awesome use of Microsoft Cognitive services and also some nifty voice controlled home automation.
It was then my turn. Unfortunately Chris van Wyk couldn’t make it this evening. 🙁
The session featured
Visual Micro for Visual Studio
Visual Studio Code with Arduino Extension which is now Open Source.
Xamarin Forms and Xamarin.Android with Android Things 0.41 Preview
The new Xamarin Iot preview for Linux based devices
Azure Iot Hubs
Devices wise
Raspberry Pi 3
Intel Edison
Raspberry Pi Zero W
Latte Panda and Arduino Leonardo
MXChip Azure Kit
Devices everywhere! Latte Panda, Pi With Android Things. NexDock
Last night was the Cross Iot Session at GXUGSA in Johannesburg. It’s always fun presenting all the Iot toys, but also what can actually be done with Xamarin and the rest of the Microsoft tooling.
It’s also not always clear that you can basically do anything you want with Xamarin, so always nice and exciting to showcase it outside the usual phone type scenarios.
Gert Talking Windows 10 Iot Core
The session featured
Visual Micro for Visual Studio
Visual Studio Code with Arduino Extension which is now Open Source.
Xamarin Forms and Xamarin.Android with Android Things 0.4 Preview
The new Xamarin Iot preview for Linux based devices
Last week I pushed the Xamarin version of the Google Contrib drivers to Nuget. I’ve now added a sample project, to illustrate how it all works. The sample also includes the use of Azure Iot Hubs.
A great test of the contrib drivers is Pimoroni’s Rainbow Hat. https://shop.pimoroni.com/products/rainbow-hat-for-android-things The Rainbow HAT brings together a lot of the components mentioned above on one board. It’s provided with the Android Things Starter Kit so it’s a very good place to start. The first sample I’ve added here focus’s on this specific HAT.
The sample added is based on the google Weather Station sample. It has one difference, it uses Azure Iot Hubs for cloud messaging.
Sample Functionality
Temperature Monitoring
Pressure Monitoring
Push Button (A) to swap display from Temperature and Pressure on the board display
Native UI for RaspberryPi to display weather based on air pressure
Telemetry sent from Android Things Device to Azure via Azure Iot Hubs
Message support from Azure to Android Things Device.
To uses the Iot hub in the sample, the DeviceId, DeviceKey and HostName of an Azure Iot hub will need to be provided. I will do a post specific on Iot Hubs to provide more detail on this in subsequent blog posts. These variables are set in the MainActivity.
 private bool _useHubs = true;   //  Set this to true to use Azure Iot Hubs

 _weatherDevice.DeviceId = "<Add Azure Iot Hub Device Id Here>";
 _weatherDevice.DeviceKey = "<Add Azure Iot Hub Device Key Here>";
 _weatherDevice.HostName = "<Add Azure Iot Hub Hostname Here>";
I’m in the process of creating more samples of the rest of the contrib library. I’m also packaging more third-party drivers from around the community into reusable Nuget packages for Android Things with Xamarin.
I’m also having a lot of fun at the moment with a version of these drivers, built from scratch to work with Xamarin Iot. We can then have these components (and Rainbow HAT) working on Linux devices which will of course be awesome!
That was using Xamarin Iot on Visual Studio for the Mac (Preview). Xamarin Iot is also however available for Visual Studio 2017 on Windows (Preview 2.1) too. Below is the identical solution just running from Visual Studio 2017 on Windows. Have a look!
Visual Studio Iot Project Template
New Xamarin Iot Agent
Visual Studio in Action
Xamarin Iot on Raspberry Pi Zero
This is just a quick look at Xamarin Iot running on a Raspberry Pi Zero, this time on Visual Studio on Windows. More in-depth content coming soon!
This is a first look at the new Xamarin Iot functionality found within Visual Studio for Mac 7.1 Preview. I will dig much further into detail in future posts, but lets have a very quick look and it. I’m really excited about this addition to the already awesome Xamarin tooling!
New Iot Project Type
A new project type has been added for Iot. This project type or template will create the solution and project needed to run on the Iot device.
Manage devices option
What’s immediately apparent is the new run option for the Iot project type. There’s now a new item called “Manage Devices”
Iot device manager
The Iot Device Manager allows all the connected devices to be managed. This setup is very similar to the Mac Agent used for iOS development with the Xamarin Visual Studio for Windows extension, however it will display all the Linux based devices running on the network. In this case and screenshot it’s a Raspberry Pi Zero running Raspian (Jesse). Configuring the device will allow remote deploys to the device from your Mac. This will require a user name and password of a user on the Raspberry Pi. This user will be used to connect to the Raspberry pi via SSH. Also note, SSH needs to be enabled on the Raspberry Pi for this to work.
Executing remotely on device
Now you can start developing your Iot solution. What’s really awesome is, all the things you expect to work will just work. This includes break points and a full debugging experience. All this can happen wirelessly to a “headless” device.
The build and execution process is very similar to the Mac Agent when you do iOS development from Windows (Visual Studio) to a Mac. The difference in this case, it is from a Mac (Visual Studio) to a Linux instance (Raspberry Pi). On the very first execution, the mono run time will be copied over to the device. This will be used to execute the built app. The application itself and it’s “built code” is also synchronized with the Raspberry Pi. This compiled Iot app is then in turn executed on the device remotely.
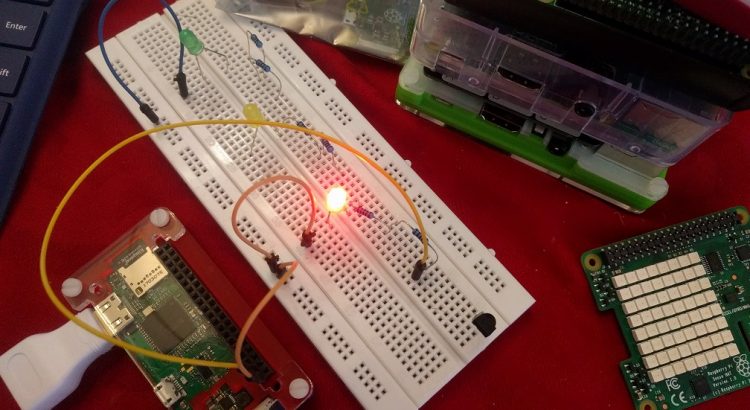
Lets see it in action! Here is a simple example of the now standard Iot demo of a flashing LED, but running on a tiny Raspberry Pi Zero W. What’s really nice about this implementation is, it runs on devices that is not supported by other Iot platforms, like Android Things and Windows 10 Iot Core. It will run on the myriad of Linux based devices out there.
There is much more to show and tell. So there’s much more blogs to come on this topic! This will also include how Android Things and Xamarin Iot can work together to make cross platform Iot simpler.
Android Things has GPIO callbacks which are triggered on certain trigger events. This is great for event handling. I’ve added a sample to Xamarin bindings which illustrates this by means of a Grove PIR (Passive InfraRed) sensor much like what’s in your home alarm system. If we use that in conjunction with a buzzer, you have a primitive alarm system.
Gpio callbacks are classes implemented inheriting from the abstract class Gpio Callback. This call back is triggered on certain trigger types. This are set on the gpio pin with the settriggertype method.
EDGE_NONE: No interrupt events. This is the default value.
EDGE_RISING: Interrupt on a transition from low to high
EDGE_FALLING: Interrupt on a transition from high to low
EDGE_BOTH: Interrupt on all state transitions
 public class AlarmCallback : Com.Google.Android.Things.Pio.GpioCallback
 {
 public Gpio BuzzerPin { get; set; }

 public override bool OnGpioEdge(Gpio p0)
 {
 if (p0.Value)
 {
 if (!BuzzerPin.Value)
 {
 BuzzerPin.Value = true;
 Thread.Sleep(1000);
 BuzzerPin.Value = false;
 }
 }

 return true;
 }

 public override void OnGpioError(Gpio p0, int p1)
 {
 Log.Info("Alarmcallback", "Error");
 }
 }
The class has two methods to override. OnGpioEdge and OnGpioError. The OnGpioEdge method is called on a trigger event. The OnGpioError is called on an error.
This class is registered on the actual input gpio pin.
_callback = new AlarmCallback {BuzzerPin = _buzzerGpio};

_alarm1Gpio.RegisterGpioCallback(_callback);
Android Things is Google’s new IOT Android based platform. In essence it’s a slightly altered version of Android which can run on Iot type devices such as the Intel Edison and the Raspberry Pi3.
“Android Things lets you build professional, mass-market products on a trusted platform, without previous knowledge of embedded system design.”
Personally I’m not yet too impressed with Android Things. It is still very new and very raw and is lacking a lot of what you’d expect from an Iot platform. However, having finally a standard Android implementation officially from Google running on these devices has to be a good thing. The platform should just get better from here.
Running in Visual Studio using Xamarin
Of course being Android, Android Things works with Xamarin too. Using Xamarin will also be a benefit for all those awesome cross platform benefits it offers, like sharing your Iot code with your backend services, Android, Ios, Windows Phone, Windows 10, OSX, XBox and whatever other devices you’d like to be supporting in your solution.
Getting the devices to appear in Visual Studio is exactly as you’d expect. The devices will use the standard Android Debugging Bridge (ADB). Plugging in an Intel Edison via USB will be reflected as “Unknown Iot_Edison”. You can obviously also use the network debugging features of ADB. eg. adb connect <ip address> The device will then also be detected in Visual Studio. A Raspberry Pi will appear as “Unknown iot_rpi3”.
Using Xamarin is very simple. All we need to do is bind to the Android Things API Jar to be able to make use of all the features provided by the Android Things SDK. At this moment in time there isn’t an official release Nuget package from Xamarin to do this. It is however very simple to do this yourself. In this sample (and I’ve shared the code on GitHub) I’m binding to the new Dev Preview 2 API for Android Things (androidthings-0.2-devpreview.jar). Once the binding project is referenced from your Android Things project, everything will work as expected. Just of course with the benefit of using C# and not Java!
I’ve created some samples based on the Standard Android Things Samples
No Iot sample and demo is complete without a blinking LED. This sample is a conversion of the Android Things sample.
Simple UI
This sample is a simple illustration of using a UI on an Android Things device. It also illustrates GPIO pins and how to set the high/low values of the pins.
Visual Studio has become a one stop shop for any type of development. But did you know you can do Arduino development as well? There is a Visual Studio extension called Visual Micro (http://www.visualmicro.com) which will allow Arduino development and debugging within Visual Studio IDE, with the full development experience you have become used to. This is a high level overview of what is provided.
Arduino and Visual Studio
What’s really great about having Arduino support within Visual Studio is, you can group together all the various different projects that makes up your solution all together within a Visual Studio Solution.
Multi-platform Solution
In a world of Iot and cross platform (or multi platform) development this is perfect. You could have one or more Arduino projects, .NET Micro framework projects, a Xamarin Mobile client and the back-end (be it an on-premise ASP .NET WEB API solution, or in the cloud with something like Azure Mobile Services) all managed together in a single Visual Studio solution.
Installing Visual Micro
Visual Micro can be downloaded here: http://www.visualmicro.com/page/Arduino-Visual-Studio-Downloads.aspx It is a Visual Studio extension which will be installed within Visual Studio. There is a version for both Visual Studio 2015 and 2017 RC. Be sure to have the standard Arduino IDE installed as well, as it uses this tooling under the hood. Arduino version 1.06 – 1.8 is supported.
The IDE Experience
Visual Micro Toolbar
Visual Micro Menu
Both a toolbar and a new menu is added to Visual Studio. The toolbar allows access to quickly configure the connected board and COM port used (via USB). It also allows quick access for building and debugging, however if the Arduino project is the startup project the debugging and build options work as usual direct from the Visual Studio hotkeys, toolbars and menu items. The menu allows for deeper configuration of the compiler, debugging options and other integration options.
File New Dialog
Templates are provided to easily create a new Arduino Sketch or Library. Standard Arduino INO files are supported. These standard file types are also used when opening and saving to existing Arduino Sketch files, which ofcourse can be ported back to the Arduino IDE if need be.
Solution Explorer
The solution explorer is quite neat for the Arduino. All the source files, header files and external dependencies are presented in much the way you have grown accustomed to in Visual Studio.
The Visual Micro Explorer provides a visualization of all libraries installed. There is also reference material and documentation provided along with a collection of Example code. This is great for both learning and quickly looking up something.
The live tracing works great. There is also the standard port monitor which does live logging of the Com ports. In the screenshot provided the codes displayed are being reported from an infrared remote control in real-time. The ability to see everything happen, and be visible, at once in an IDE saves a whole load of time.
Conclusion
I’ve been using Visual Micro for a few Arduino related Iot projects and can definitely recommend using it.
With Microsoft Build 2016 complete, there are so many things to be looking at and trying out. One of the more useful features for me right now is the new remoting functionality in Windows 10 IoT Insider Preview 10.0.14295. I have this running on a Raspberry Pi 3 and I am busy with some work using an array of sensor telemetry. Being able to see what is happening remotely make life far easier when building Universal Apps.
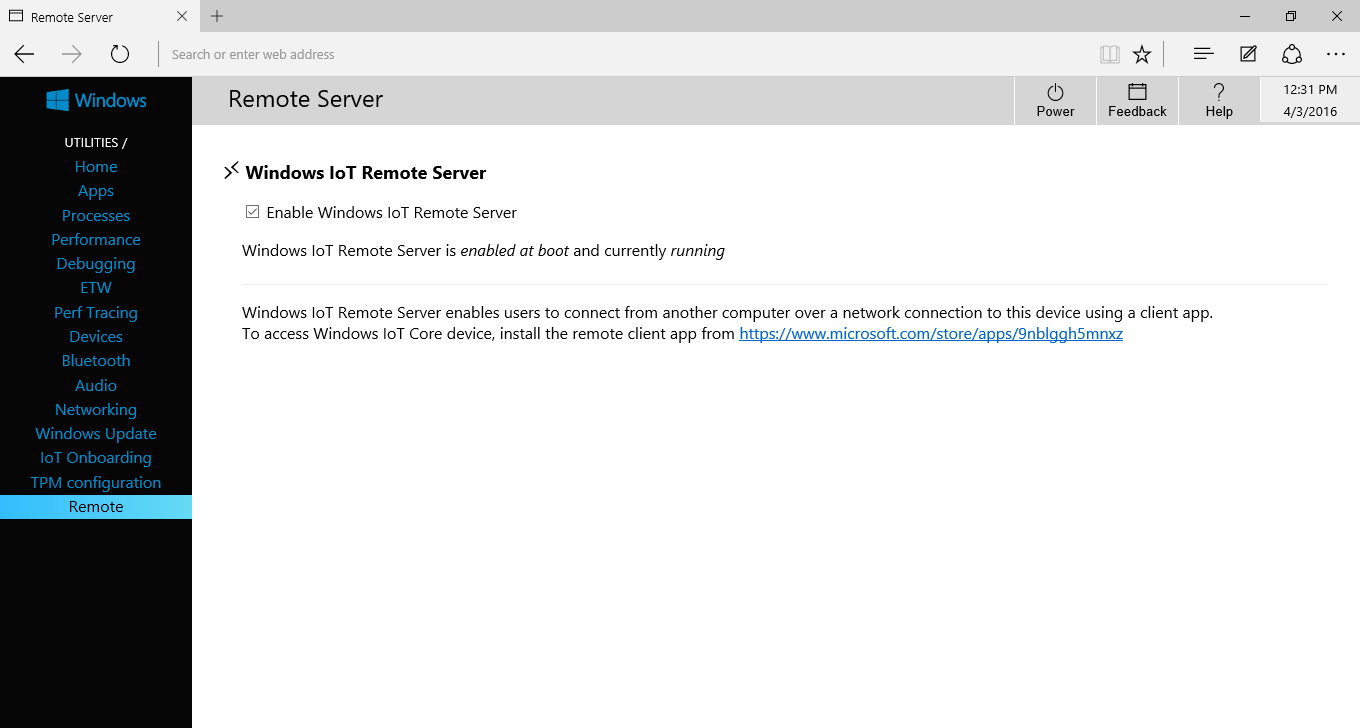
To configure this is very simple. There is a new menu option added to the administration console called “Remote”. This is accessible via the URL: http://[ipaddress of pi]:8080. If you haven’t changed the password the login should be: “Administrator” and “p@ssw0rd”
Enable the Windows IoT Remote Server by ticking the box presented.
To access the Raspberry Pi remotely you need a client. This is available in the Windows Store either by following the provided link, or just by searching for “Windows IoT” in the store. https://www.microsoft.com/store/apps/9nblggh5mnxz
This will run on any Windows 10 device. Just something to note: on a Windows 10 Mobile device (Lumia 950 XL in my case) you may have to set the device color scheme to light for the application text to be legible. I’m sure this will be corrected in later builds.
Fill in the IP address of the Raspberry PI in the “Enter an IP address” text box and click / tap “Connect”. You should now be seeing what the Raspberry Pi is displaying.
Remoting to a Windows 10 PC / TabletRemoting to a Lumia 950 XL
Day 1 of Build 2015 has been great! The IoT inclusions especially have been very exciting for me.
We now have Windows 10 IoT core released and running on:
Raspberry Pi 2
MinnowBoard Max
Galileo
Also very interesting and exciting news is, we have Arduino support from Microsoft.
Windows Remote Arduino
Windows Virtual Shields for Arduino
Let’s start by installing Windows 10 IoT Core Preview on a Raspberry PI 2. I know many of you that bought a PI just to do this, I know I did. 🙂
Start by downloading the “Windows_IoT_Core_RPI2_BUILD” from “https://connect.microsoft.com/windowsembeddedIoT/Downloads“. I had to accept some EULAs and click around before anything appeared to be selected for download. It could have also been a timing problem as I was a bit eager to download and perhaps it was not available that soon.
The requirement for the installation is a Windows 10 Build 10069 or higher PC to copy the Windows 10 IoT installation onto an SD card . I downloaded the new Windows 10 Build 10074 ISO that was released today from “http://windows.microsoft.com/en-us/windows/preview-iso-update-1504“.
Install Windows 10. I ignored the recommendations and installed on a Virtual Machine (on VMWare) and not a physical PC. VMWare passes through the SD card without problems to Windows 10.
Once everything is installed, copy the “Flash.ffu” file from the downloaded “Windows_IoT_Core_RPI2_BUILD” zip file to a folder on the Windows 10 PC.
From an Administrator Command line run the following command:
diskpart
list disk
exit
Note the number of the disk associated with the SDCard.
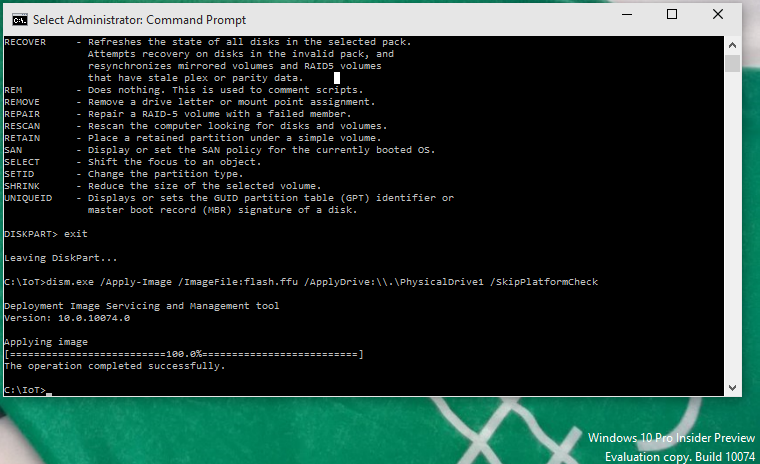
Run the dism command replacing the N in “\PhysicalDriveN” to the number noted above.
After a short wait, you should see: “Operation completed successfully”. Eject the SD card.
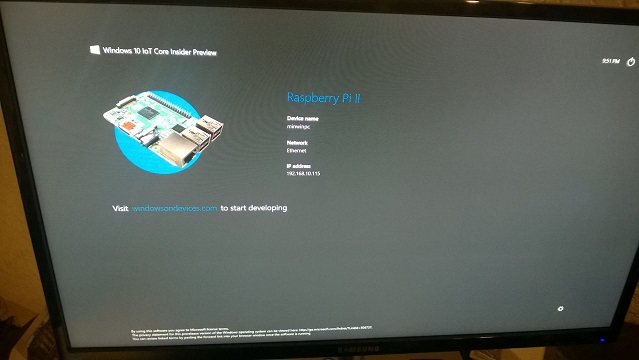
Insert the SD card into the SD card slot in the Raspberry PI 2. Plug the HDMI cable into the PI and of course the monitor. Plug the power cable into the Raspberry PI. After a few worrying minutes Windows 10 IoT should be all booted up. It will reboot once during the initial setup process and the interesting blocks displayed in-between the Windows Logo appearing and final boot-up seems normal.