Thank you everyone who attended my session at both DevConf Cape Town and Johannesburg I met so many awesome people during DevConf inside and outside of my session! Thank you for making DevConf 2024 the incredibile conference it was!
I’ve included the slides for those interested in building your own DIY Microscope, or something similar to help you with your own accessibility challenges. If you have an imaging device with some intelligence, there’s so many things you can do!
The project is using a Raspberry Pi 3B (4 and 5 works too). It is build using C# and .NET 8. The user interface is created using AvaloniaUI. There’s nothing better that Avalonia if you need to create small, incredibly fast user interfaces on Linux using .NET. I really recommend trying it out!
The backend is using Azure CosmosDB for storage. The MongoDB VCore Implementation. This is chosen for it’s vector search capabilities. Perfect for a conversational solution using OpenAI.
The whole premise of the talk was to inspire developers to think about using all these tech components in your toolbox. Both AI and IoT bits and use it for good. There’s so many solutions that could be created especially for accessibility, to make people’s life a little easier. This is also exactly why I created this Microscope, to solve my own accessibility problems when building IoT solutions. Think about what you could do!
There has been some nice progress on the pure c# library for the EV3 Lego Mindstorm Brick from Lego and the BrickPi3 from Dexter Industries. The BrickPi is great as it adds loads of extra processing power and more importantly memory for the EV3 kit using a Raspberry Pi.
The library is for both Xamarin.IoT and Android Things. As soon as it’s ready I’ll post the source to GitHub. If there is interest, I can also spend some time and port the Android Things implementation to Java or Kotlin for Android Studio.
The ultimate plan is to use this in a Lego based robot as a play project, but the experimentation will form basis of an actual larger artificial intelligence project. It will also be hooked up to Azure IoT for the telemetry.
I was inspired enough to dust off one of my older projects which included .NET MF and the Xamarin Monkey Robotics project. I then decided to consolidate and rearrange it with some of the newer stuff I’m playing with in the “Iot” space. It’s also an example of how Visual Studio can handle projects of all types, held together and fully “debuggable” within one solution. This seems like a good time to do this especially with the recent talks at the Xamarin User Groups in Cape Town (http://explorationspace.co.za/2017/07/20/cross-platform-iot-at-ctxug/) and Johannesburg (http://explorationspace.co.za/2017/07/12/cross-platform-iot-at-gxugsa/) on the topic.
Visual Studio Controller of Things Solution
I do still have to port all this to Visual Studio 15.3 preview 3 so I can have Xamarin Iot working in the solution as well.
Still a lot of on the list to do today, so I’ll end off here.
Last night was the Cross Platform Iot Session at CTXUG in Cape Town. The turnout was absolutely amazing! Thank you to all for coming it was a really fun evening!
Roger Weiss from Aliens kicked off with an overview of Windows 10 Iot Core and a few demos. These demos featured some awesome use of Microsoft Cognitive services and also some nifty voice controlled home automation.
It was then my turn. Unfortunately Chris van Wyk couldn’t make it this evening. 🙁
The session featured
Visual Micro for Visual Studio
Visual Studio Code with Arduino Extension which is now Open Source.
Xamarin Forms and Xamarin.Android with Android Things 0.41 Preview
The new Xamarin Iot preview for Linux based devices
Azure Iot Hubs
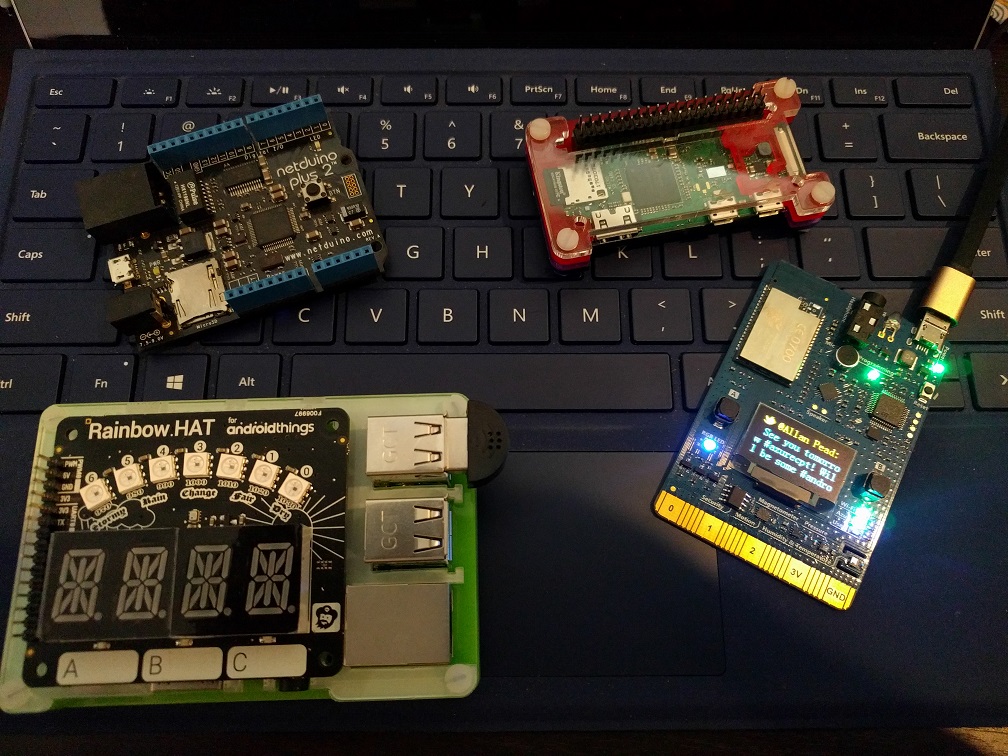
Devices wise
Raspberry Pi 3
Intel Edison
Raspberry Pi Zero W
Latte Panda and Arduino Leonardo
MXChip Azure Kit
Devices everywhere! Latte Panda, Pi With Android Things. NexDock
Last night was the Cross Iot Session at GXUGSA in Johannesburg. It’s always fun presenting all the Iot toys, but also what can actually be done with Xamarin and the rest of the Microsoft tooling.
It’s also not always clear that you can basically do anything you want with Xamarin, so always nice and exciting to showcase it outside the usual phone type scenarios.
Gert Talking Windows 10 Iot Core
The session featured
Visual Micro for Visual Studio
Visual Studio Code with Arduino Extension which is now Open Source.
Xamarin Forms and Xamarin.Android with Android Things 0.4 Preview
The new Xamarin Iot preview for Linux based devices
Last week I pushed the Xamarin version of the Google Contrib drivers to Nuget. I’ve now added a sample project, to illustrate how it all works. The sample also includes the use of Azure Iot Hubs.
A great test of the contrib drivers is Pimoroni’s Rainbow Hat. https://shop.pimoroni.com/products/rainbow-hat-for-android-things The Rainbow HAT brings together a lot of the components mentioned above on one board. It’s provided with the Android Things Starter Kit so it’s a very good place to start. The first sample I’ve added here focus’s on this specific HAT.
The sample added is based on the google Weather Station sample. It has one difference, it uses Azure Iot Hubs for cloud messaging.
Sample Functionality
Temperature Monitoring
Pressure Monitoring
Push Button (A) to swap display from Temperature and Pressure on the board display
Native UI for RaspberryPi to display weather based on air pressure
Telemetry sent from Android Things Device to Azure via Azure Iot Hubs
Message support from Azure to Android Things Device.
To uses the Iot hub in the sample, the DeviceId, DeviceKey and HostName of an Azure Iot hub will need to be provided. I will do a post specific on Iot Hubs to provide more detail on this in subsequent blog posts. These variables are set in the MainActivity.
 private bool _useHubs = true;   //  Set this to true to use Azure Iot Hubs

 _weatherDevice.DeviceId = "<Add Azure Iot Hub Device Id Here>";
 _weatherDevice.DeviceKey = "<Add Azure Iot Hub Device Key Here>";
 _weatherDevice.HostName = "<Add Azure Iot Hub Hostname Here>";
I’m in the process of creating more samples of the rest of the contrib library. I’m also packaging more third-party drivers from around the community into reusable Nuget packages for Android Things with Xamarin.
I’m also having a lot of fun at the moment with a version of these drivers, built from scratch to work with Xamarin Iot. We can then have these components (and Rainbow HAT) working on Linux devices which will of course be awesome!
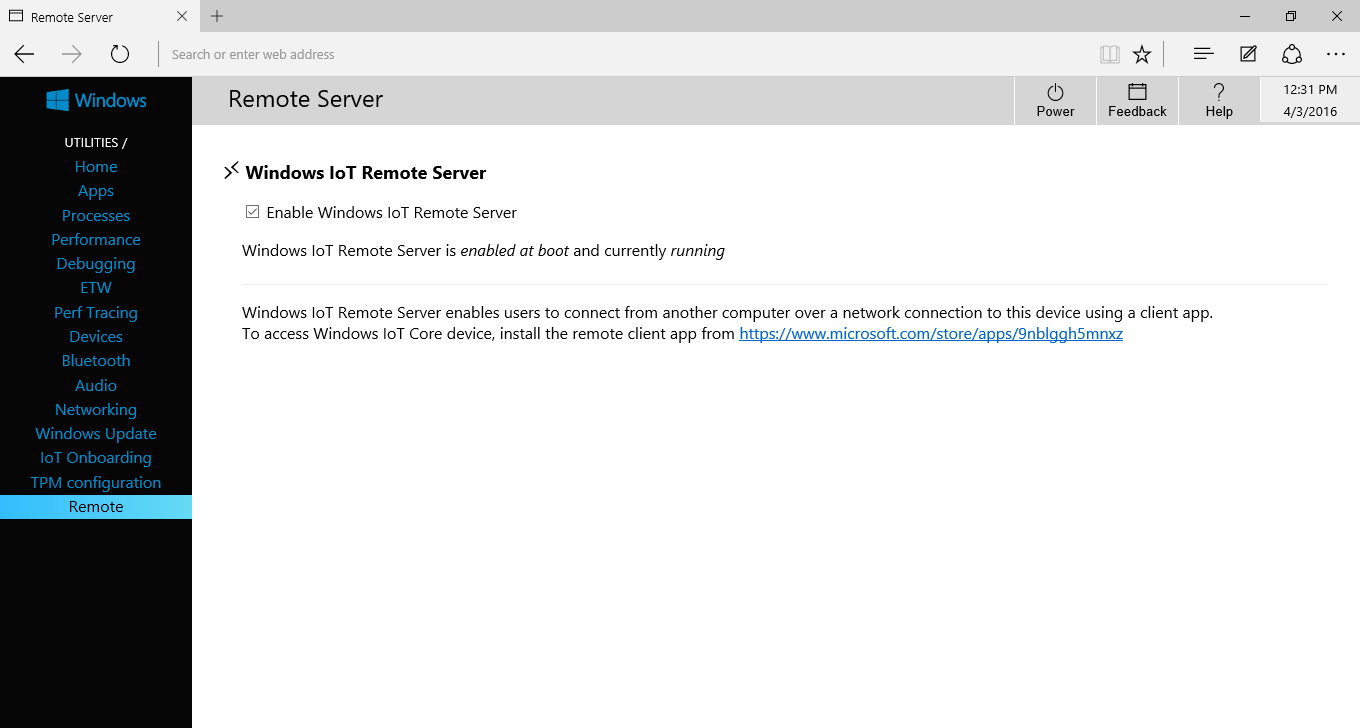
With Microsoft Build 2016 complete, there are so many things to be looking at and trying out. One of the more useful features for me right now is the new remoting functionality in Windows 10 IoT Insider Preview 10.0.14295. I have this running on a Raspberry Pi 3 and I am busy with some work using an array of sensor telemetry. Being able to see what is happening remotely make life far easier when building Universal Apps.
To configure this is very simple. There is a new menu option added to the administration console called “Remote”. This is accessible via the URL: http://[ipaddress of pi]:8080. If you haven’t changed the password the login should be: “Administrator” and “p@ssw0rd”
Enable the Windows IoT Remote Server by ticking the box presented.
To access the Raspberry Pi remotely you need a client. This is available in the Windows Store either by following the provided link, or just by searching for “Windows IoT” in the store. https://www.microsoft.com/store/apps/9nblggh5mnxz
This will run on any Windows 10 device. Just something to note: on a Windows 10 Mobile device (Lumia 950 XL in my case) you may have to set the device color scheme to light for the application text to be legible. I’m sure this will be corrected in later builds.
Fill in the IP address of the Raspberry PI in the “Enter an IP address” text box and click / tap “Connect”. You should now be seeing what the Raspberry Pi is displaying.