Arduino Smart Watering Kit with Azure IoT Central

I came across this Smart Watering Kit by Elecrow. It was really great, but one thing missing is internet conectivity. We all know that we can’t grow plants without the “I” in IoT! So let’s see what we can do about that!

Electrow Ardunio Smart Plant Watering Kit
Inside the box

The kit comes with everything you need to water four different plants automatically.

The box contains

  • Arduino Leonardo
  • Power Supply
  • Pump
  • 4 Capacitive Moisture Sensors
  • 4 Way valves
  • Pipes

The kit is very comprensive and includes and LCD display which can show at a glance the conditions of your plants.

The board
Serial Port

The board unfortunately does not have built in wifi connectivity. But what it does have is a serial port. That’s perfect, so what we could do is use that to send telemetry out to another device that is internet / wifi enabled.

A good device for that is a good old (and cheap) 8266 board. I had a NodeMCU in my box of tricks, so I decided to use that.

Parts List

  • Arduino Smart Watering Board (Arduino Leonardo)
  • NodeMCU board
  • 2.2 K ohm resistor
  • 1 K ohm Resistor
  • 470 ohm Resistor
  • Breadboard
  • Wires
  • Power Supply

Connecting an Arduino Leonardo to a Node MCU via Serial Port

First step is to make it work on a breadboard.

Parts List

  • Arduino Smart Watering Board (Arduino Leonardo)
  • NodeMCU board
  • 2.2 K ohm resistor
  • 1 K ohm Resistor
  • 470 ohm Resistor
  • Veroboard
  • Wires
  • Power Supply
Connecting an Arduino Leonardo to a Node MCU via Serial Port

Once working, the next step is to build that onto a more permanent solution. I decided to use just veroboard as it was quick and easy.

Two boards up and running

IoT Central

Device Templates

Device Capabilities

Create device capabilities for the moisture sensors as telemetry (Moisture1, Moisture2, Moisture3, Moisture4). [Device Definition json file is in the github repository along with the source code]

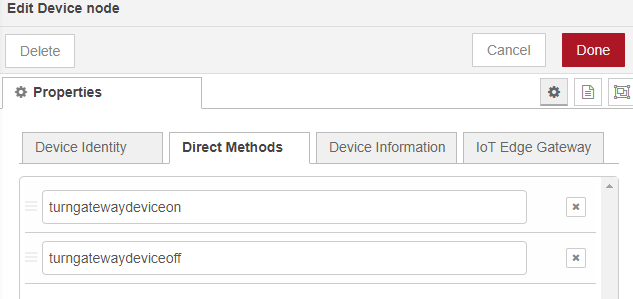
Create properties for the 4 relay states for each of the 4 valves. [Device Definition json file is in the github repository along with the source code]

Create a property for the pump state. [Device Definition json file is in the github repository along with the source code]

Publish the template and create an instance of the template as a device.

Instance of a device template

Note the “connection” information for the new device instance.

Device “Connection” information

Take note of the following:

  • Scope ID
  • Device ID
  • Primary Key
iotcserialrelay.ino

Update the iotcserialrelay.ino file with the:

  • WIFI_SSID – The wifi hotspot ssid
  • WIFI_PASSWORD – The wifi hotspot password
  • SCOPE_ID – The Device Instance’s Scope Id
  • DEVICE_ID – The Device Instance’s Device Id
  • DEVICE_KEY 0 The Device Instance’s Key

Deploy iotcserialrelay.ino to NodeMCU.

Deploy watering_kit.ino to the Arduio Smart Watering Board.

Telemetry in IoT Central

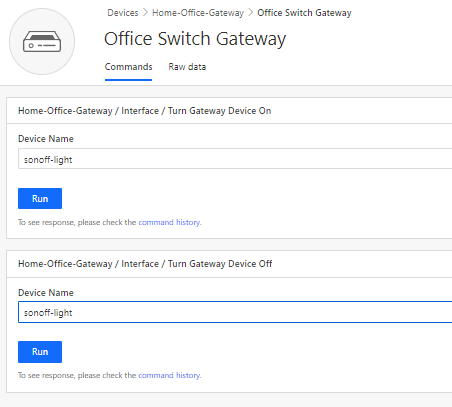
Once deployed and connection is made, telemetry starts appearing within IoT Central’s dashboard.

Finished Product with happy plants powered by Microsoft Azure ๐Ÿ˜Ž๐Ÿ˜Ž

Source code: https://github.com/apead/SmartWateringKit

Product Information: https://www.elecrow.com/arduino-automatic-smart-plant-watering-kit.html

Where to buy? https://www.robotics.org.za/AAK90039K

Building an Azure IoT Central “Gateway” using Node-RED

I control a few devices from the Internet, but I don’t want all devices exposed and connected to IoT Central. One solution is to build a gateway locally which routes request messages to switch things on or off to the correct device locally.

In this post we will look at how to send commands from IoT Central and route them using Node-RED to the automation device via MQTT.

Home Automation Gateway Architecture

This architure uses Node-RED as a gateway, and then uses Eclipse Mosquito as a MQTT server. The Grow Light and Air Conditioner in the diagram is an off the shelf Sonoff POW-R2 device flashed with Tasmota.

Flashing with Tasmota

Installing Eclipse Mosquitto in a Container

Installing Node-RED in a Container

“Gateway” flow in Node-RED

With Node-RED you can visually map the flow / sequence of events. Node-RED supports Azure IoT Hubs and Azure IoT Central, so it’s perfect for this job to do quickly and easily without having to write code.

Gateway device created in IoT Central’s Command Capabilities

In Azure IoT Central we have a single device linked with a command. The command accepts a parameter, which will be the device name / topic name on the local MQTT server.

Executing a command on IoT Central

The diagram above shows the command with the parameter.

Defined Methods to IoT Central Commands

The Node-RED Azure component supports Direct Methods. These are commands that you can directly invoke on a device. In this case, the device is the gateway itself created within Node-RED.

It supports two methods (as per Azure IoT Central template)

  • turngatewaydeviceon
  • turngatewaydeviceoff
Switch to determine flow based on Direct Method Invoked from IoT Central

With a Node-Red switch statement we can controll the flow with whichever method name was invoked from IoT Central.

Switch Home Automation On flow

If it’s the “DeviceOn” flow, then the device parameter name (payload) is used to build up the topic for the Sonoff device via MQTT. The payload of the message will be “on”.

Switch Home Automation Device Off Flow

If it’s the “DeviceOff” flow, then the device parameter name (payload) is used to build up the topic for the Sonoff device via MQTT. The payload of the message will be “off”.